

JK Inner C Gussets
SKU : JK4405
Regular price
$102.29
$86.95
JK Inner C Gussets

- Precision fit that wraps around axle inner C not just adds a flat gusset
- Contoured inner C gusset adds reinforcement
- CNC laser cut and CNC bent for precise fit
- Engineered using 3D scan files
- Made in the USA
- JK made from ¼” Steel
- JL & JT made from 3/16” Steel
- *Requires welding
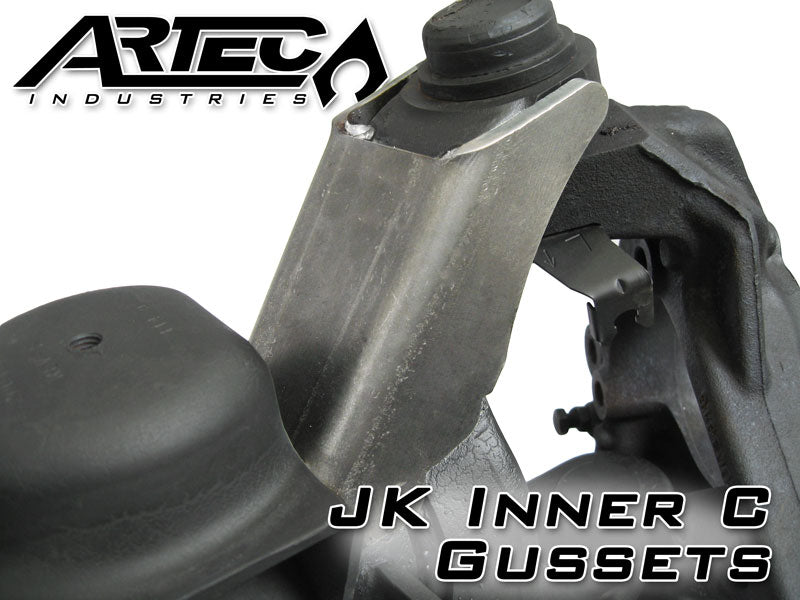
Artec’s Heavy Duty Inner C Gussets reinforce your front Dana 30 or 44 Jeep inner C’s, taking on serious off-road use. Made from precision-cut 3/16” thick steel, they contour perfectly to your inner c, providing essential rigidity and reinforcement to an area that’s prone to damage and flexing. Upgrade your adventure rig with Artec’s durable, precision-engineered solutions.
Reviews
Install Instructions
The installation of this product Requires
Welding, Fabrication, and Mechanical skills. You will need to remove the axle
from the vehicle to perform this Job. If
you are not confident in your abilities Please have this product installed at
an Off-road Shop.
Tools Required:
Safety glasses, socket set, wrenches, torque wrench, Needle
nose Pliers, Drift Punch set, tie rod separator, ball joint separator, Bungee
cords, Ball joint press, grinder or wire wheel, Welder, Welding PPE, Jack, Tall Jack stands.
Step 1:
Inventory all parts to ensure you have all of the correct
pieces. If you
are missing parts Contact Artec Industries Immediately at (855) 278-3299 M-F 8:30-5pm MST If outside of those hours
Email us at Sales@Artecindustries.com (Please include picture of part number
label on box as well as your invoice number)
Step 2:
Loosen the front lug
nuts. (Do not fully remove them, Just break them free.)
Step 3:
Secure and properly block the rear tires of vehicle on a
level surface .
Jack up front of vehicle and install jack stands under frame
behind the lower link brackets. and keep a jack under the axle.
Step 4:
Remove wheels from vehicle,
Remove front drive shaft from the axle ,
Remove the brake calipers and rotors (Set the
rotors on a flat surface so they do not warp), Hang the calipers from
the body with some bungee cords (Do not let the
calipers hang freely from the brake lines this can damage them.)
Step 5:
Remove the hub/axle shaft from Jeep as a unit With the hubs and axle shafts removed stuff
some rags in axle tubes.
Step 6:
Remove cotter pins on Tie rods, Then loosen the castle nuts. (Leave the castle
nuts installed by a few threads ! ) Remove
the Steering stabilizer , Grab your Tie
rod Separator, wedge it between the knuckle and the base of the tie rod the hit on the end of the Tie rod separator
with your Big Freaking Hammer until it pops loose. Repeat this on the other
side. Remove the castle nuts and the Drag-link and tie rod should drop off the
Jeep. Now Unbolt and remove the knuckles
from the axle, Using your ball joint press remove the ball joints from your C’s
(Tip: If you have a small Map gas
torch heat the Castle nuts and heat the
knuckle some this will help break parts free in the rust belt states.)
Step 7:
Remove the coil spring retainers from the axle, Remove Shocks, sway bar end links, and Track
bar.
Step 8:
Using a jack lower slowly lower the axle to remove the coil
springs. Raise the axle back up and
place jack stands under the axle
Step 9:
Remove upper and lower control arms. Pull the axle out from under the vehicle for
more room to work.
Step 10:
Heat the knuckles to about 300-400 degrees and weld on the C
Gussets.
Wrap the C’s in a welding bracket and allow to cool
slowly.
(The JK4405-1 are universal and work
on either side of the top of the knuckle
The JK4405-3 is driver side lower and JK4405-2 is passenger side lower)
Step 11:
Apply a thin coat of grease onto your ball joints and
Install into the C’s .
(We have found if you Place your Ball Joints in freezer for a few
hours before you install it can help them shrink and go in easier.)
Step 12:
Place your coil spring on the spring bucket to verify it
fits around the C Gusset.
(In rare cases the coil spring may
contact the C gusset if it does make contact mark the location on the c gusset
where it makes contact then remove the spring and grind a small relief so the
spring clears.)
Step 13:
Move the axle back
under the Jeep and install the upper and lower control arms
(A drift punch can help with align the bolt holes, Do not fully tighten
the bolts.)
Step 14:
Install the coil springs and retainers then Raise the axle
onto jack stands.
Step 15:
Install the track bar, shocks, and sway bar end links on to
the axle
(Do not fully tighten the bolts.)
Step 16:
Install the knuckles
on to the vehicle and install Tie rod onto the vehicle along with the steering
stabilizer.
Torque the Upper ball Joints, Lower ball joint, Tie rod ends,
Steering stabilizer to factory specs .
Step 17:
Remove the rags from
the axle tubes . Place some grease on
the splines of the axle shafts an
carefully slip the axle shafts and unit bearings into place . Torque the hub
bolts to factory specs
(Make sure you support the axle
shaft as it passes into the housing and do not force it into place this could
risk damaging the axle seals )
Step 18:
Install the rotors and calipers onto the Jeep an the torque
caliper bolts . Then install the wheels
and tires, tighten lug nuts.
(Do not torque lug nuts yet)
Step 19:
Lower the Jeep off of the Jack stands and onto the
ground. Once the Jeep is on its own
weight.
Torque all bolts to factory specs.
After 50 Miles torque all bolts to their proper specs.

Community Discussion