

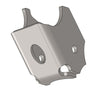
TJ 30-44 Lower Control Arm Brackets (pair)
SKU : TJ3012
Regular price
$87.99
$74.79
TJ 30-44 Lower Control Arm Brackets (pair)

- 2.625" mounting width fits common sized cartridge joints and factory control arm bushings
- Integrated skid plate
- Joint protection from direct impact
- Decreases premature wear on joint
- Designed to not interfere with joint movement
- Secured to axle better than OEM so it doesn’t rip off
- 1/4" thick steel
- Boxed plate for strength and impact resistance
- Sold in a pair

Off-roading is all about adventure, but bent and mangled factory lower control arm brackets can quickly spoil the fun. Artec’s Heavy Duty Brackets provide a reliable replacement that ensures you’ll never have to worry about bracket damage again. Unlike standard factory brackets, ours are specifically designed to improve functionality. Enjoy the thrill of the off-road without worrying about equipment failure.
Reviews
Install Instructions

TJ3011/TJ3012 Instructions :
Warning:
This Part Requires Fabrication
Skills (Cutting, Grinding, Welding) If
you are not confident in your abilities Please have this product installed at a
Local Off-Road Shop .
Tools Required:
Safety Glasses, Gloves, Wrench set, Socket Set, Torque
wrench, Jack, Jack stands(Tall and
short) , Wheel chock, Cutting Tool(s)(Angle Grinder with cutting and flap disk
, Sawzall, Plasma cutter, Cutting torch) and Welder.
Step 1:
Take an inventory of your parts, If you are missing any parts Please contact
Artec Industries Immediately @ (855) 278-3299
M-F 8:30am-5pm MST
Step 2:
Break free the lug nuts on the front of the Jeep (Do not completely loosen or remove the lugnuts!)
Place wheel chocks at the rear wheels of the vehicle. Jack up the front of the Jeep as high as you
can place the jack stands securely under the frame of the Jeep and under the
axle. Now lower the jack.
Step 3:
Remove lug nuts and the front wheels to provide more working
space .
Step 4:
Use a 21mm wrench and socket to remove the lower control arm
completely
(Take a photo reference of where your cam slot
location is on the vehicle before removing you’ll need this later on TJ3011 Only)
Step 5:
With the lower control arm removed use a your cutting tool
of choice to remove the lower control arm bracket off of the axle and grind the
surface smooth with a angle grinder using a flap disk to ensure it is clean and
ready for welding .
Step 6:
Control arm Bracket
Orientation TJ3011-1 & TJ3012-1 Will be on the Passenger side, TJ3011-2 &
TJ3012-2 Will be for the Driver side .
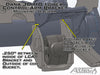
Step 7:
Place the Corresponding control arm bracket under the axle
Rotate it up under the coil bucket the tab on the outside of the control arm
bracket should make contact with the underside of the coil bucket. Once that makes contact measure 1/4" between the inside edge of
the control arm bracket and outside of the coil bucket Then weld into place.
Step 8: (TJ3011 Only )
Weld the TJ3011-3 Pieces (Cam adjustment plates) on the control arms the control arm bracket
will have a laser etched mark for placement.
Step 9:
Weld the seams where
the sides and bottom of Lca mount meet the front corners (if looking from front
of vehicle) can be left open to help Water and mud drain .
Step 10:
Paint brackets with a self-etching primer and paint (We find
that rustolem gives the best results.)
Step 11:
Reinstall the Lower control arms ( We find it easier to slip
axle end of the arm into bracket first then put the frame side into place. Slip in the bolts and keep the nuts loose.
Step 12:
Install tires and lugnuts (Do not
fully tighten lug nuts)
Step 13:
Use a Jack to raise the Jeep off of the Jack stands and
remove them from under the vehicle then lower the Jack .
Step 14:
Torque the Lug nuts to Manufacturer Spec. ( 95ftlbs)
Step 15:
Adjust Cam bolt so it matches the Photo reference you took
earlier (TJ3011 only)
Step16:
Torque Lca bolts To 85ftlbs At axle end and 130ftlbs at the
Frame (Stock control Arms)
If you have Aftermarket
control arms refer to their manufacturers spec Most aftermarket lowers control arm manufacturers
suggest 90ftlbs for frame and axle end of link.
Step 17: Take vehicle to have an alignment performed
to ensure everything is in proper adjustment .

Community Discussion