

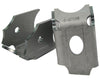
Lower Link Axle Brackets (pair)
SKU : BR1079
Regular price
$64.99
$55.24
Lower Link Axle Brackets (pair)

- ¼" thick boxed steel plate for strength and impact resistance
- 2.625” mounting width with a 9/16” bolt hole
- Top access grease fitting for easy maintenance
- Skid plate protects joint from impact and decreases wear for longer life
- Skid plate design does not restrict joint movement
- Unique custom style for a one-off look
- Build it yourself kit
- CNC laser cut and CNC bent for precise fit
- Engineered using 3D scan files
- Made in the USA
- *Requires welding

Take your off-roading adventure to the next level with Artec Industries DIY fabricated brackets. Our team designed this particular bracket to seamlessly integrate into your vehicle, with features like better access to grease fittings, and bottom protection for the joint on the lower link brackets. This bracket boasts a 2.625” mounting width with a 9/16” bolt hole, perfect for common sized cartridge joints. Plus, its ¼" thick boxed steel plate construction ensures strength and impact resistance, so you can tackle any terrain with confidence.
Reviews
Install Instructions
Warning:
Installing this product requires Welding and Fabrication skills, If you
are not confident in your abilities to complete this task please have this
installed at an qualified off-road shop .
Tools required: Safety glasses, Socket Set, Wrench Set,
Torque wrench, Angle Finder, Cutting
tools ( Example : sawzall, grinder, plasma cutter, cutting torch, ) Welder,
Jack, Jack stands, Wheel Chocks.
Step 1:
Please take inventory of parts, Call Artec Industries Immediately if you have incorrect or missing
components @ (855) 278-3299 M-F 8am-5pm MST
If outside of those hours please send us an Email at
Sales@ArtecIndustries.com
Step 2:
Loosen your lug nuts on the rear wheels (do not fully remove
them)
Step 3:
Place wheel chocks at front wheel of the Jeep, Jack up the rear of the Jeep and
Securely place the Frame onto Tall Jack
stands and axle onto shorter Jack stands
.
Step 4:
Remove the Lug nuts and wheels from vehicle. Completely remove the lower
control arm from the vehicle (We recommend only working on 1 side of the
vehicle at a time.)
Step 5:
Cut off your lower control arm mount from the axle and grind
the area smooth to prep for welding.
Step 6:
Place the lower
control arm mount on axle in desired position for your build and tack weld into
place
( Some of these mounts are side specific, so ensure they
angle towards the center of the vehicle 10/22 degree brackets only )
Optional : For greater ground clearance rotate up
Step 7:
Spray the LCA bracket with a self-etching primer and paint.
Step 8:
Reinstall the Lower Control Arm axle side first then install the frame side of the arm, Install the bolts and nuts finger tight at
this time !
Step 9 :
Repeat Steps 5-8 on the opposite side of the vehicle
Step 10:
Install the wheels back on the vehicle and tighten the lug
nuts (do not torque them yet)
Step 11:
Use the jack to raise the Jeep off of the jack stands and
remove them from under the vehicle Then lower the Jack .
Step 12:
With the vehicle on the ground Torque the lug nuts to
manufacturer spec
Step 13:
Torque the Lower control arms If you have Aftermarket arms
refer to the arm manufacturers specs (most adjustable arms will have a spec
around 90ft lbs)
Step 4
Check bolts for
tightness after 50miles or a few trips off-road (whichever occurs first)

Community Discussion