


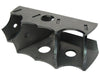
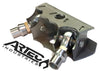
Large 4-link Xmember Bracket
SKU : BR1006
Regular price
$114.99
$97.74
Large 4-link Xmember Bracket

- ¼" thick boxed steel plate for strength and impact resistance
- 2.625” mounting width with a 9/16” bolt hole
- Top access grease fitting for easy maintenance
- Skid plate protects joint from impact and decreases wear for longer life
- Skid plate design does not restrict joint movement
- Unique custom style for a one-off look
- Build it yourself kit
- CNC laser cut and CNC bent for precise fit
- Engineered using 3D scan files
- Made in the USA
- *Requires 1" lift
- *Requires welding
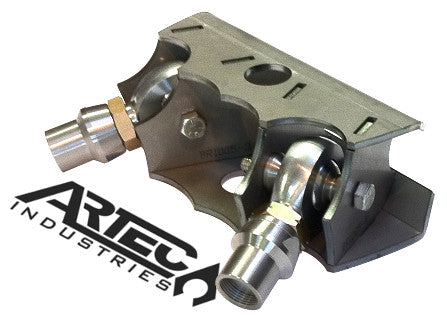
Take your off-roading adventure to the next level with Artec Industries DIY fabricated brackets. Our team designed this particular bracket to seamlessly integrate into your vehicle, with features like better access to grease fittings, and bottom protection for the joint on the lower link brackets. This bracket boasts a 2.625” mounting width with a 9/16” bolt hole, perfect for common sized cartridge joints. Plus, its ¼" thick boxed steel plate construction ensures strength and impact resistance, so you can tackle any terrain with confidence.
Reviews
Install Instructions
Warning:
This Part Requires General
Mechanical Abilities If you are not
confident in your abilities Please have this product installed at a Local
Off-Road Shop .
Step 1:
Take an inventory of your parts, If you are missing any parts Please contact
Artec Industries Immediately @ (855) 278-3299
M-F 8:30am-5pm MST if it is after those hours please email us pictures
of what you received , along with product labels on the box and packing slip at
Sales@artecindustries.com
Place Part's 3 and 4
into the keyed slot on part number 2
(the 3's will go on the outside and 4's will go on the inside if of part
2) the edges of the brackets should
line up.
insert your link in-between parts 3 and 4 use a bolt and nut to secure them . Once they are secure place part 1 on top of
the tabs for parts 3 and 4 .
Tack weld all of the brackets together Then remove the joints .
Place the bracket onto your Cross member in your desired position
and tack weld it into positon
Fully weld the bracket together and onto the cross member
Prime and paint the bracket.

Community Discussion