


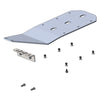
JLU eTorque ALUMINUM Skid
SKU : JL4103
Regular price $229.99
JLU eTorque ALUMINUM Skid

- Complete protection for Full Bellypan System or modular options for Oil and Transmission Pan, Fuel Tank and Transfer Case, Etorque Skid, or Exhaust Skid.
- Premium Materials: 1/4” 6061 T6 heat treated aluminum skids
- Premium materials: Zinc-plated steel brackets
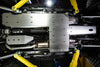
- Designed from factory CAD files and 3D laser Creaform scan technology for precision and fit.
- CNC laser cut and formed for high strength and perfect fitment.
- Artec Industries custom bolts countersunk bolts that match OEM thread
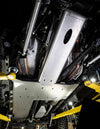
- No overlapping skid plate system
- Gains additional ground clearance over OEM
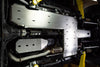
- Fuel tank drop eliminated with our additional strap
- Crossmember is engineered for durability and strength
- Easy installation
- Easy servicing
- Easy to remove access points
- Easy maintenance
- No rust
- Light weight, high strength
- American Made
Experience "Ultimate" heavy-duty strength and quality with the leader in off-road protection, Artec Industries. Crafted from 1/4” thick 6061 T6 bare aluminum skids that are heat-treated for maximum strength, and 3/16” zinc-plated steel brackets, our Battery Skid is incredibly durable for any terrain. It is CNC cut and formed to ensure a perfect fit with factory components, providing ultimate protection for your vehicle's underside. With Artec Industries' high-quality Battery Skid, you can confidently tackle any rough terrain without worrying about damage. Experience heavy-duty strength and quality with the leader in off-road protection, Artec Industries. **NOTE: NOT COMPATIBLE WITH JL4118 EXHAUST SKID**
This product requires general mechanics skills and should only be installed by someone capable of using basic tools. Artec Industries is not responsible for incorrect installation. By purchasing, the customer agrees that they are fully responsible for correct installation.
Reviews
Install Instructions

Community Discussion