


JK APEX Raised Tracbar Bracket
SKU : JK4452
Regular price
$87.99
$74.79
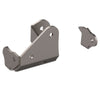
JK APEX Raised Tracbar Bracket

- 1/4" steel
- CNC laser cut and CNC bent for precise fit
- Engineered using 3D scan files
- Replaces factory bracket
- Engineered for lifts 3” or higher
- Raises roll center for increased stability
- Improved ground clearance
- Made in the USA

Upgrade your vehicle’s off-roading capabilities with Artec Industries’ Heavy-Duty Rear Trackbar Bracket. Built to withstand serious abuse, this bracket replaces your worn factory bracket and offers superior performance with ¼" thick precision cut components. With raised trackbar holes for multiple lift styles, this bracket also adjusts the roll center higher for greater stability and improves ground clearance over factory brackets. Don’t settle for subpar equipment. Choose Artec Industries for the ultimate off-roading experience.
Notes : NOT FOR USE WITH 1ST GENERATION ARTEC TRUSSES. ENSURE YOUR RECEIPT SAYS JK APEX TRUSS FOR COMPATIBILITYWITH THIS PRODUCT
Reviews
Install Instructions
Warning:
This Part Requires General
Mechanical Abilities If you are not
confident in your abilities Please have this product installed at a Local
Off-Road Shop .
Tools Required:
Safety Glasses, Gloves, Wrench set, Socket Set, Torque
wrench, , Tie rod separator, Jack, Jack
stands(Tall and short) , Wheel chock,, Cutting tool (sawzall , cutoff
wheel, plasma cutter ect...) Welder and welding ppe.
Step 1:
Take an inventory of your parts, If you are missing any parts Please contact
Artec Industries Immediately @ (855) 278-3299
M-F 8:30am-5pm MST if it is after those hours please email us pictures
of what you received , along with product labels on the box and packing slip at
Sales@artecindustries.com
Step 2:
Place wheel chocks at the rear wheels, Break free the lug nuts on the front
wheels. Use a jack to raise the front of
the vehicle and set the front axle on jack stands . then remove the wheels from
the vehicle .
Step 3:
Remove the steering stabilizer
from the axle, Now remove the tie rod and draglink from the Steering knuckles
and pitman arm, Remove the sway bar end
links form the axle. With the steering
removed Cut off the Oem Track bar
and clean the area of any rust, dirt or paint to prep the axle for the
new Artec track bar mount.
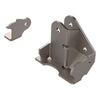
Step 4:
Place part number 2
tab into key way on part number 1
slip your track bar between parts # 1 & 2 using run a bolt and nut through
the holes on the bracket and track bar to set the mounting width of the track bar
tack weld Part 2 onto part 1. Remove
the track bar from the bracket and fully weld Part 2 to Part number 1
Step 5:
Line the corner of the coil bucket up with the slot cut out
on part number 2 and set the corner of the coil bucket into the relief on
part 2 and tack weld the bracket to the axle. Once the bracket is tacked into
place fully weld the bracket into position.
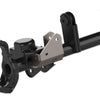
Step 6: Take part 3 with the pointed end towards the
top and slide it up until it contacts the under side of the coil bucket and
slide it towards the end of the axle so the side of part 3 will contact the oem
stabilizer tab. Weld it into place .
Step 7:
Install the track bar back into the Jeep, Then reinstall the sway bar end links, Install the Tie rod and draglink then
install the stabilizer. then the wheels
(do not fully tighten lug nuts yet )
Step 8:
Using a jack raise the Jeep and remove the jack stands from
under the axle . Lower the vehicle to the ground and torque all of the bolts to
their factory specs . Take the Jeep to
have an alignment performed to make sure the alignment is in spec to prevent
abnormal tire wear.
After 50 miles Check all bolts for tightness and tighten if
needed .

Community Discussion