

Group 34 Optima Battery Mount
1,125 Entries
15X
SKU : OP3401
Regular price
$87.99
$74.79
Artec Industries Battery Mount offers top-notch quality, durability, and easy battery viewing. It's lightweight and strong with a snug fit to preve... Read More
Artec Industries Battery Mount offers top-notch quality, durability, and easy battery viewing. It's lightweight and strong with a snug fit to prevent premature wear. Choose Artec for a reliable battery mount solution. Read Less
Share :
Ask A QuestionGroup 34 Optima Battery Mount

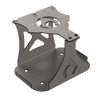
- One-piece design for added strength and lighter weight
- Battery fits snugly, preventing premature wear and shorter lifespan
- Clear "window" for easy battery viewing
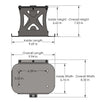
- CNC cut from 1/8" steel plate
- Self-clinching (PEM) nuts included
- 5 - 1/4" bolts w/ nylock nuts for securing battery
- Mounting: 4 - 1/4" countersunk holes in bottom or direct weld
- Reliable and durable battery mount solution
- Provides unbeatable quality for your vehicle
- * Finish: Bare Steel - COATING REQUIRED TO PREVENT RUST

Artec Industries' Battery Mount provides unbeatable quality and durability for your vehicle. The mount features self-clinching (PEM) nuts, a clear "window" for easy battery viewing, and is CNC cut from 1/8" steel plate for a lightweight and strong design. The battery fits snugly, preventing premature wear and shorter lifespan caused by unnecessary movement. Choose Artec Industries for a reliable battery mount solution.
Reviews
Install Instructions
Step 1 : Inspect and open package, Verify all contents are accounted for.
Step 2: Test fit battery(s) into battery mount to verify the battery fits.
Step 3: Remove battery(s) from battery mount .
Step 4: Place battery mount where you plan on mounting it
Step 5: Mark bolt holes where battery mount will bolt to vehicle or where it will be direct welded
Step 6: Remove battery mount
Step 7: Move/Protect any vital components that could be damaged from drilling or welding example : brake lines, hoses, wiring harnesses etc.
Step 8: Drill previously marked areas, Or Prep Area for welding by removing any paint, powder coat , or oils so surface is raw
Step 9: Paint areas where you drilled to prevent rust
Step 10: Paint or powder coat Battery Mount prevent rust this is a raw steel item Only Perform this step if you are mounting via drilling method. If you are going to mount via welding skip this step for now we will come back to it later.
Step 11: Install battery mount into vehicle If directly welding mount into vehicle weld it in
Step 12: See Step 10 if you welded mount to vehicle Proceed to next step if mounted via Drilling method
Step 13: Install battery(s) into Battery mount
Step 14: Take pictures, Show off how awesome your rig is now to your buddies !
*Note* There will be a small gap between battery mount lid and tray when battery mount lid is securely installed into place.

Community Discussion