
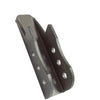
Adjustable Frame Panhard Mount - Outside 1.75 inch
SKU : BR1027
Regular price
$43.99
$39.59
Adjustable Frame Panhard Mount - Outside 1.75 inch

- ¼" thick boxed steel plate for strength and impact resistance
- 1.75” mounting width with a 9/16” bolt hole
- Unique custom style for a one-off look
- Build it yourself kit
- CNC laser cut and CNC bent for precise fit
- Engineered using 3D scan files
- Made in the USA
- *Requires welding

This panhard mount is for use with any 3-link or 4-link scenario. Designed for joints that have a 1.75" mounting width such as 3/4" and 7/8"x3/4" rod ends with high misalignment spacers. It offer three holes at 2, 3.25, and 4.5 inches drop from frame to allow you to fine tune your suspension. Offered with an outside the frame orientation.
Reviews
Install Instructions
This part requires welding and fabrication
skills if you are not confident in your abilities please take to an Off-road
shop to install this part.
Tools Required :
Safety Glasses, Gloves,
Socket Set, Wrenches, Wheel chocks, Jack, Jack stand. Cutting Tool of your choice (Sawzall,
Grinder, plasma, cutting torch) Welder.
Step 1:
Inventory that you have all of the parts for your order If you are missing parts or have incorrect parts contact
Artec Industries Immediately @ (855)-278-3299
M-F from 8am-5pm MST If it is
after those hours please Email Sales@Artecindustries.com
Step 2:
Place wheel chocks in front of and behind the wheels on the
opposite end of the vehicle from where you are working at.
Step 3:
Break free the lug nuts (Do not
fully remove the lugnuts) Jack the vehicle up, Securely lower the vehicle onto Jack stands
under the axle .
Step 4:
Remove the wheels from under the vehicle and set aside.
Step 5:
Remove track bar from vehicle. With the track bar removed
from the vehicle cut off the Oem track bar mount. Clean the frame of any remnants of the oem
track bar mount and prep for welding.
Step 6:
The Br1027 bracket can be placed on the frame in line with
the axle side track bar mount and welded into place.
Step 7:
Clean the parts to ensure they are free from any machining
oil, Prime with a self-etching primer and Paint.
Step 8:
Measure your distance from axle side track bar mount to
Frame side mount hole that will allow your draglink and track bar to run on the
same angle. use that measurement to
fabricate a track bar just leave some wiggle room in the joints so you can
adjust the track bar.
Step 9:
Install your new track bar (leave the bolts loose) , Put
wheels on the vehicle and tighten lug nuts.
Step 10:
Raise vehicle off of the jacks stands and lower vehicle onto
the ground and tighten the track bar bolts and torque the lug nuts.
Step 11:
Take vehicle to an alignment shop to make sure geometry is
correct.
Check bolts for tightness
after 50miles and tighten if needed.

Community Discussion