


Full Hydro Weld-On High Steer Arms - 99-04 SuperDuty
SKU : HS6153
Regular price
$296.99
$252.44
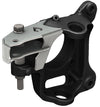
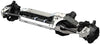
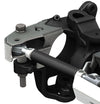
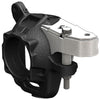
Full Hydro Weld-On High Steer Arms - 99-04 SuperDuty

- Configurable and affordable weld-on arms for optimal steering setup
- Fully fabricated for best geometry and clearances
- Allows straight tie rods and clears deep differential covers
- Includes knuckle bolts and tapered spacers for tight fit and increased strength
- 3/4" bolt holes for uncompromising steering strength
- Precision laser-cut from 1/4" steel and CNC bent for accurate fitment
- Minimal modification to OEM knuckle needed*
- Sold in pairs.

Artec Industries' weld-on arms are configurable and affordable to eliminate swap steering issues, providing three variations for optimal steering setup. They are fully fabricated for the best steering geometry and clearances, allowing straight tie rods and clearing even deep differential covers. The included knuckle bolts and tapered spacers provide a tight fit and increased strength, while 3/4" bolt holes ensure uncompromising steering strength. These arms are precision laser-cut from 1/4" steel and CNC bent for accurate fitment, and minimal modification to the OEM knuckle is needed. Sold in pairs.
Reviews
Install Instructions
Warning:
Installing this product requires Welding and Fabrication skills, If you
are not confident in your abilities to complete this task please have this
installed at an qualified off-road shop .
Tools required:
Safety glasses, Socket Set, Wrench Set, Cutting tools ( Example : sawzall, grinder,
plasma cutter, cutting torch, ) Ball joint press Welder,
Jack, Jack stands, Wheel Chocks.
Step 1:
Please take inventory of parts, Call Artec Industries Immediately if you have incorrect or
missing components @ (855) 278-3299 M-F 8am-5pm MST If outside of those hours please send us an
Email at Sales@ArtecIndustries.com
Step 2:
Remove the steering from the knuckles then remove the
knuckles from the axle .
Step 3:
Drill out the knuckle bolt hole to accept a 3/4"
bolt. and remove your ball joints from
the knuckle
Step 4:
Clean and prep knuckle surface of all dirt, Grease, Paint
and other debris to ensure the surface is ready for welding
Step 5:
Heat the knuckle to 400 degrees once knuckle is up to temperature Lay the knuckle flat on hub side down rest the Hs6153-3 flat against the knuckle
with the round cutout at the bottom around the steering stop stanchion post .
Step 6:
Slip the Hs6153-1 onto the knuckle ( There is a laser etch
mark at the top of the Hs6153-1 & -4
This may need to be trimmed due to casting variations throughout the
production years ) . Now Slip the HS6153-2 into the center of the HS6153-1 and it should key into
the groove on the hs6152-3 . Now take your knuckle bolt kit and run it
through the large round holes and bolt into place you should have some of the sleeve
sticking out of the top of the Hs6153 bracket .
Step 7:
Take your heim joints and misalignment spacers and bolt them
into position to set your joint spacing
and tack weld the HS6153 parts together and remove the heim joints.
Step 8:
Once the heim joints are removed you can fully weld all of
the parts together. Post heat and peen
the welds to ensure they do not crack
and wrap the parts in a welding blanket to cool slowly overnight.
Step 9:
Prime paint or powder coat the knuckles to finish the
surfaces
Step 10:
Press in new ball joints
and install onto the axle.
Step 11:
Repeat this process for the other side .

Community Discussion