


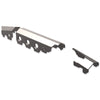
UD60 Front APEX Truss
SKU : TR6064
Regular price
$131.99
$112.19
UD60 Front APEX Truss

- PATENTED APEX peaked top for rigidity
- Lightweight 3/16" mild steel, 7 lbs
- CNC precision laser cut/bent for fitment
- Designed with Dana/Jeep 3D models
- 70% less welding, less warping, lower costs
- No long seam welding needed
- Dimpled holes for weight reduction and strength
- Weldable with MIG, moderate pre/post-heating
- Prevents axle tube spinning in UD60
- Strengthens axle's weakest sections
- Low profile design for slight lift vehicles
- Made in the USA

Experience unparalleled rigidity and tube spin prevention with Artec Industries' APEX Truss for your front axle. Our PATENTED axle trusses redefine cost savings, strength, weight savings, installation simplicity, precision fitment, and complete axle protection. The APEX Truss' unique peaked shape top offers increased rigidity, weight reduction, and eliminates long weld seams, preventing weld warping and ensuring consistency. Designed to combat UD60 axle tube spinning, the UD60 Front APEX Truss epitomizes low-cost, easy-to-weld, strong, and comprehensive axle reinforcement. For ultimate insurance for your axle, choose the APEX Truss.
- TR6063 -Use on JK front UD60 axle
- TR6064 - Use on JL/JT front UD60 axle
*Some grinding and fitment may be required when installing this kit. Every axle varies slightly and some fabrication may be required.
Notes : This kit requires general welding and fabrication skills including welding to the cast center section. Welding should only be done by a competent welder. Artec Industries implies no guarantees or warranties and is not liable for improper installation.
Notes : This kit requires general welding and fabrication skills including welding to the cast center section. Welding should only be done by a competent welder. Artec Industries implies no guarantees or warranties and is not liable for improper installation.
Reviews
Install Instructions
While we're working on the detailed instructions, here's some tips on installing your APEX truss. Refer to online pictures for orientation of the truss.
STEP 1. Unpack contents of shipment. Remove axle from vehicle for best results and easiest installation. Prior to mockup make sure axle is clean and uninstall any oem and aftermarket bolt-on accessories that may conflict with truss installation. Remove axle breather hose and uninstall any electric locker wires from casting. This area will be welded so care should be taken to prevent these components for melting.
STEP 2. Place parts 1 and 3 on the axle around the pumpkin. These parts should drop right on and self-center. Part 2 requires a little more work. It may require a little force to pop past the bushing.
STEP 3. Using a marker or paint pen, indicate the areas on the axle where the truss touches the axle to prepare for welding. Remove truss pieces from axle. Using an angle grinder with either a flapper disc or wire wheel brush, clean the surface of the axle tube, casting, upper control arm mount, and coil perch until bare steel is exposed. Clean surfaces on drivers side casting, tube, and coil perch in a similar fashion. Repeat step 2 and place all truss pieces back on axle.
STEP 4. Prior to welding, ensure that the bottoms of all the truss pieces are touching the axle tube flush. Place tack weld on truss pieces to hold all in place. Double check all truss pieces are straight.
STEP 5. Begin welding small strips of truss that touch the axle tube. You want to move around to different parts of the axle as you weld so you don't heat up areas too much. Place a welding blanket over welds so they do not cool too quickly.
STEP 6. To weld truss to cast section with best results, preheat casting evenly around where truss contacts to approximately 400 degrees. DO NOT HEAT UNTIL GLOWING RED AS THIS MAY DAMAGE THE CASTING. Once preheated, weld truss to casting before it cools. For best results, use a needle scaler or peening hammer to relieve the weld directly after welding. Post heat the area to approximately the same temp you used to preheat. Wrap axle in a welding blanket to slow the cooling process, the cooling should be slow (18-24hrs.) and uniform. (The idea behind this method is to relieve the stresses in the materials prior to welding, and ensure that the plate steel does not cool quicker than the cast resulting in stress cracks.)
STEP 7. When completely cooled, check for any cracks in weld especially around the casting. If cracks are discovered repeat the necessary steps above, grinding out any cracked welds and prepping the area.
STEP 8. Once axle is ready, paint truss and axle where bare steel is exposed to prevent rusting. After paint is dry, reinstall axle breather hose, electric locker wire, and any other components. Install axle according to manufacturers specs.

Community Discussion