


JK Front 3-Link Frame Mount Bracket
SKU : JK2020
Regular price
$76.99
$65.44
JK Front 3-Link Frame Mount Bracket

- ¼" thick boxed steel plate for strength and impact resistance
- 2.625” mounting width with a 9/16” bolt hole
- Skid plate protects joint from impact and decreases wear for longer life
- Skid plate design does not restrict joint movement
- Unique custom style for a one-off look
- Build it yourself kit
- CNC laser cut and CNC bent for precise fit
- Engineered using 3D scan files
- Made in the USA
- *Requires at least 2" lift
- *Requires welding
This Bracket was designed to provide the missing piece for those wanting to build their own JK Front 3 Link suspension. Used in conjunction with our JK Crossmember with Link Mounts, you have the base to build the ultimate front 3 Link Suspension like the one on our ARTECON. The precision cut and formed components of this setup ensure a hassle-free installation. Features include: 1/4" Thick mild steel. Precision CNC Laser cut and bent for great fitment.* Bracket is tabbed and gusseted for maximum strength and easy assembly. Overall low profile design & provides a sleek design that is easy to fit, and less likely to interfere with vehicle components. THIS KIT IS INTENDED FOR VEHICLES WITH AT LEAST MINOR LIFTS. IF USING WITH NO LIFT, CHECK CLEARANCES BEFORE INSTALLING. NOT TESTED IN NON-US JKs WITH DIESEL ENGINES or RIGHT HAND DRIVE AXLES. NOTE: This kit requires general welding and fabrication skills including welding to the cast center section. Welding should only be done by a competent welder. Artec Industries implies no guarantees or warranties and is not liable for improper installation. *Some grinding and fitment may be required when installing this kit. Every axle varies slightly and some fabrication may be required.
Reviews
Install Instructions
Basic Instructions
This guide is only intended to show placement. Please use all appropriate methods to ensure quality welding and safety.


- Test fit all parts to ensure they jig correctly together.
- Locate the space on passenger side frame rail directly in front of crossmember.
- Use a C-clamp to clamp the crossmember on the passenger side to the frame brackets holding it.
- Unbolt the crossmember bolts on the passenger side. These will be installed later in the reverse direction.
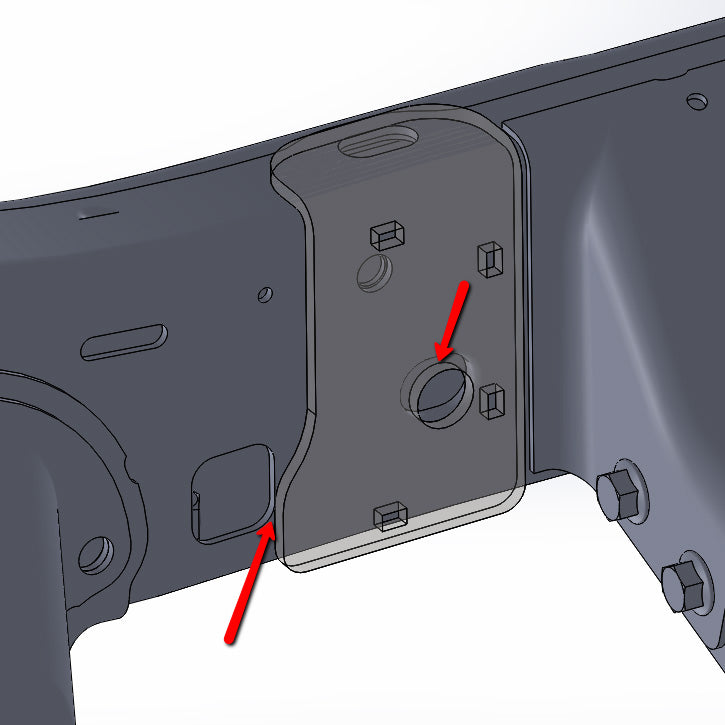
- Place part JK2020-1 on the frame according to diagram 1 below. The front edge of the bracket should line up with the back edge of the square hole in the frame and the large round hole in the bracket should line up with the front of the slotted hole in the frame as shown in diagram 1.
- You will be welding this plate to the frame so mark the edges of the bracket, remove the bracket then sand the paint off the frame until bare steel is showing. Make sure the frame is absolutely clean prior to welding.
- Replace part JK2020-1 back on the frame and weld the bracket to the frame.
- Place parts 2 and 3 together along with the joint you plan on using. Bolt the joint to the holes to get proper spacing and tack weld the parts together (It helps to add a very thin shim to make installation and removal easier). Remove joint and fully weld parts 2 and 3 together.
- Fully weld all seams of part 2.
- Place part 2 on part 1 on the frame according to the Jigs shown and weld them together. Let cool sufficiently.
- Paint bracket and frame to prevent rusting.
- Install crossmember bolts in opposite direction and remove C-clamp.
- Install joint in bracket.

Community Discussion