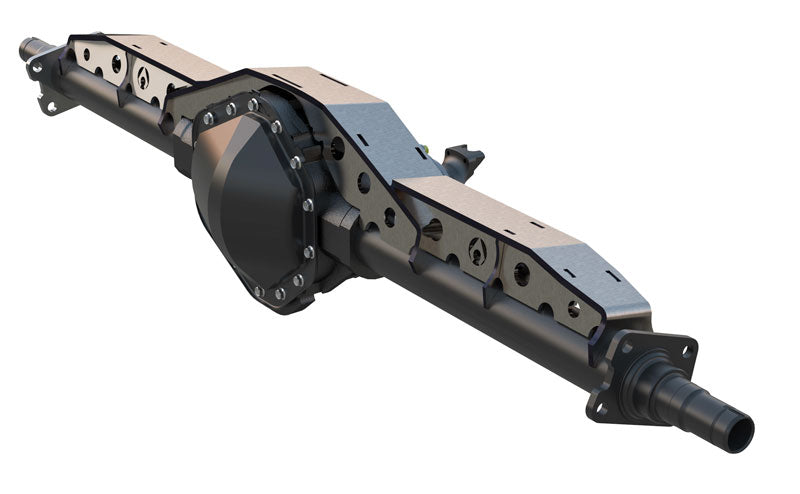
Modular Truss End

- 3/8" mild steel truss top and 1/4" mild steel gussets for strength and precision fitment
- Compatible with Artec Modular and Short Trusses and other short style trusses
- 3.5" axle tube diameter for compatibility with most axles
- Allows for customization of truss system to fit specific needs
- Provides a lower profile than standard rear trusses for clearance and bumpstop pad
- Reinforced with interlocked 1/4" gussets for maximum strength and easy assembly
- Overall low profile design results in a stronger, sleeker axle that fits easily into any vehicle without interference.
- Made in the USA

Artec Industries' NEW Modular Truss Ends complement Modular and Short Trusses for full-width trusses. Features a Low Profile design, strengthening axle with 3/8" thick truss top and 1/4" thick gussets. Provides link mounting surface or bumpstop pad. Can use long Modular Truss End with a 14 bolt short truss to make a 14 bolt front axle. Overall length is 20.73".
Reviews
Install Instructions
THIS PART REQUIRES WELDING AND GENERAL
FABRICATION SKILLS. ONLY COMPETENT WELDERS SHOULD ATTEMPT TO INSTALL THIS PART.
Tools Required :
Safety Glasses, Gloves, , Socket Set, Wrenches, Wheel
chocks, Cutting Tool of your choice
(Sawzall, Grinder, plasma, cutting torch)
Welder.
Step 1:
Inventory that you have all of the parts for your order If you are missing
parts or have incorrect parts contact Artec Industries Immediately @
(855)-278-3299 M-F from 8am-5pm MST. If
it is after those hours please Email Sales@Artecindustries.com
Step 2:
Place wheel chocks at the rear wheels of the vehicle. Break free lug nuts on front wheels (Do not fully loosen or remove lug nuts yet.)
Step 3:
Jack up the front of the vehicle and set the axle on Jack
stands, Remove the front wheels from the vehicle, With the wheels removed Jack the vehicle up
again. Securely place tall jack stands
under the frame behind the LCA or Leaf
spring mounts at the previously measurement of ride height. Place a 2nd sent of
jack stands under the front axle.
Step 4:
Measure the Width of your Truss between the end of it and
length of Axle tubes and record the measurement,
Measure the width of the TR0004 truss to determine where you need to cut and
trim to fit your specific build .
Step 5:
Clean and prep the axle tubes and truss for welding.
Step 6:
Trim the Tr0004 (if needed)
set the truss on the axle and butt against existing truss on the axle.
Tack weld the Tr0004 to the Truss and axle .
Then remove the axle from under the vehicle for more room to weld the
Truss end to the Axle. Once the axle is pulled from under the vehicle. Heat the axle to about 400 degrees Start
to weld the gussets to the axle and
truss .When welding, Start on one side of the axle, Weld a small amount, Then
move on to the opposite side of the axle to allow each side to cool. This will
help prevent warping. Stitch welding is preferred and welding every inch of every seam is not
necessary. If you have any Control arm mounts, Shock mounts, Coil over tabs,
Track bar mounts that need to be welded on to the axle you will need to place the axle under the
vehicle on jack stands at ride height and desired wheelbase an weld them on at
this time in their proper location for your specific build. Once all of the welding is complete you will
wrap the axle in a welding blanket to slowly cool overnight.
Step 7:
Clean the Truss and axle of any machining oils and Prep for
paint or powder coating
Step 8:
Install the axle back under the vehicle and place on jack
stands. Install the wheels on the vehicle and tighten the lug nuts (Do not
torque them down yet.) Lift the vehicle
and remove all of the jack stands and set the vehicle on the ground. with the vehicle on the ground check all of
the bolts and lug nuts are torqued to proper specs. we recommend drawing a line
on the nut and bolt heads and where they are mounted for quick reference when
checking for tightness after 50 miles .


Community Discussion


