DESCRIPTION
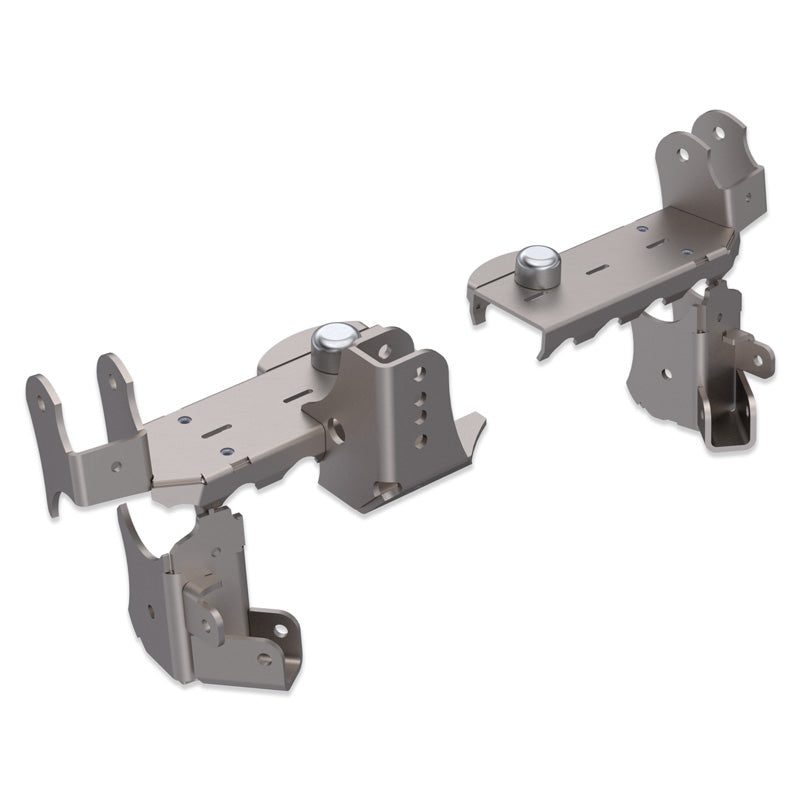
JK 1 TON APEX Rear Axle Swap Brackets
The new APEX brackets for swapping in a
1 ton rear axle into a Jeep JK Wrangler ('07-'17)
Features include:
- Using a 1 ton axle will support larger tires and less chance of breakage in extreme conditions
- Coil brackets and bump stop pads are combined to form an axle tube truss and allows for easy installment of other brackets
- Precision CNC cut from 1/4", 3/16" steel for high strength and precision and CNC bent for great fitment.*
- Includes all the brackets necessary for a complete axle swap including upper and lower control arm mounts, shock mounts, anti-sway bar mounts, trackbar mount, bumpstop pads and coil spring mounts.
- Save hours of installation time with the built-in axle tube truss which is quicker to weld than individual bracketsTracbar mount includes 4 locations for those who have aftermarket lifts. Stock height hole is not included though.
- Coil Spring locator is machined from solid steel making welding to bracket quicker than previous tube and cap style locators
- Easily upgradeable for future link geometry changes. Just trim off factory location upper control mounts and weld on a truss and center link mount (not included)
- APEX truss can be added later for great rigidity, strength and link suspension changes

REVIEWS
Instructions
Use the following template for another swap kit as a base for install on this kit. The provided template tool is used by placing the etched writing as you would read it and placing it on top of the axle tube next to the casting. The template will indicate either driver or passenger side and which axle you are using. The template will touch the side of the top plate of the bracket, not the bent side.
Click image above to view Installation Instructions
Warning: This Part Requires GeneralMechanical Abilities along with Weldingand Fabrication skills to install if you are not confident in your abilitiesPlease have this product installed at a Local Off-Road Shop .
Tools Required:
Safety Glasses, Gloves, Wrench set, Socket Set, Torquewrench, Pliers , Jack, Jack stands(Tall and short) , Wheel chock, Welder,Cutting tool (Cutoff wheel , Sawzall ) Angle Finder , tape measure ,
Step 1:
Take an inventory of your parts, If you are missing any parts Please contactArtec Industries Immediately @ (855) 278-3299 M-F 8:30am-5pm MST if it is after those hours EmailSales@artecindustries with a picture of what you have and packing slip. You will also need to save the box if damagedper our shipper in order to file a shipping claim
Step 2:
Place wheel chocks at the front wheels of the vehicle. Break free lug nuts on rear wheels (Do not fullyloosen or remove lug nuts yet.)
Step 3:
With the vehicle sitting on the ground, Measure your rideheight at the frame and height of the centerline of the axle, Also takemeasurement of your wheel base.
(Make a note of this for later.)
Step 4:
Jack up the rear of the vehicle and set the axle on Jackstands, Remove the rear wheels from the vehicle, With the wheels removed Jack the vehicle upagain. Securely place tall jack stands under the frame in front of the LCAmounts at the previously measurement of ride height. Place a 2nd sent of jackstands under the rear axle.
Step 5:
Disconnect Brake Lines, Emergency brake cables, , Remove Rear Drive shaft, Remove Rear Diff Breather , (Disconnect anyRear Locker Airline or Harness if Equipped ) Remove Shocks, and Remove RearTrack bar. and remove rear coil spring retainers.
Step 6:
Using a floor jack Raise the rear axle off of the jack standsand temporarily remove them from under the axle . Slowly lower the Jack to lowerthe axle down and remove the coilsprings . Once the coil springs areremoved Raise the Jack and place it backon Jack stands . Remove the Upper andlower control arm bolts from the axle and remove the axle from under thevehicle.
Step 7.
Prep axle the truss will be welded onto by removing allmounts and paint/ rust. Once the axle isprepped. Slide new axle under the vehicle and place on jack stands at themeasurement of what the centerline height was at ride height also make sure itis set to the wheelbase. Using another jack stand or block of wood set underthe pinion on the axle set the desired pinion angle of your build to ensure itdoes not get changed . Now place the truss on top of the axle and tack into position
Step 8.
Place Part -1 onto the axle tube an make sure it is flatand parallel with the ground, Side Part 1 over until it contacts thetruss Tack weld part 1 to the axle tube
slip Part 5 onto the top of the axle tube and slide the keyway onto the tab on part 1 and tack into position. Repeat this step on thepassenger side .
Step 9 .
Place tab on bottom part of part 9 into key way on part 10tack into place then place part 11 tab into key way on part 9 with the tab atthe top of the bracket so the stabilizer mount is at the bottom . then tackinto position . Place part 9 on the driver side axle tube and roate towards backof axle until the tab on the top of the bracket slips into the key way on part1 then tack into position Repeat thisstep on the passenger side
Step 10.
Insert part 3 in the keyways on the pinion side of part 1and tack into position. Place part 17 onto part 1 there will be a laser etchpark to locate position the furthest rear position will be stock positionfurthest forward will be for a 1" stretch tack weld that into position. Repeaton the passenger side .
Step 11.
Pull the rear axle from under the vehicle and fully weld allof the tack welded parts together . Take the rear track bar bracket part 8 slip the tab into part 7 using your track bar bolt parts 7 and 8together to set the spacing . and tackweld together . remove the track barfrom the bracket and fully weld it together . then slip the track bar bracket into the 2 keyways on part 1 and fullyweld it together
Step 12.
Paint or powder coat the truss/axle .
Step 13.
Place axle under rear of Jeep, Install the upper and lowercontrol arms, Insert the coil springs and bolt the -15 retainer to the part 17.
Install the rear track bar use a floor jack to raise theaxle onto jacks tands and reinstall the shocks, brake lines, breathers andlocker wiring/air lines .
install the rear tires and tighten lug nuts. raisevehicle off of jack stands and lower to the ground once on the ground tighten all bolts and lug nuts tomanufacturer spec
After 50 miles check all bolts for propertorque and re tighten if needed .