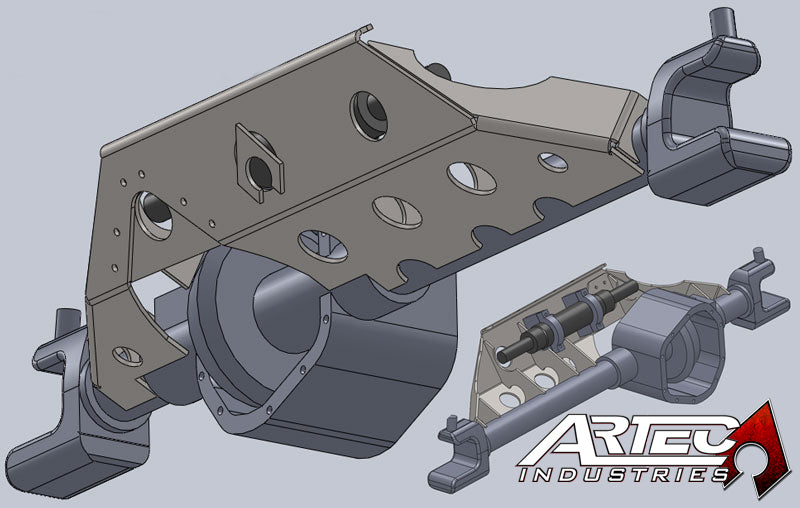
60 Full Hydro Ram Mount (No Truss)

- 1/4" mild steel ram mount and gussets
- CNC laser cut and CNC bent for precise fit
- Engineered using 3D scan files
- Drainage holes for easy cleaning and reduced weight
- Protect your ram, tie rods, and reinforce your Axle with Artec’s Ram Mount skid plate.
- Easy to service gears
- Flush surface hardware
- Fits most doubled ended hydraulic rams

Introducing Artec Industries' Hydraulic Ram Mount - the ultimate solution for protecting your vehicle's steering system. Our heavy-duty mount is designed to endure extreme abuse and safeguard your vital and expensive steering components. With a unique placement near the Axle center line and an integrated 1/4" thick skid plate, it's built to withstand rocky terrains. Compatible with most double-ended hydraulic rams and designed to work seamlessly, it provides the strongest hydraulic steering solution available. Our gusseting design reinforces the mount to resist impact damage, while the end-to-end Axle tube extension reinforces the Axle against bending and shearing. *RM6005 Dodge Ram Mount is intended to be used with the Passenger Side Drop Dodge KingPin Axles. *Some grinding and fitment may be required when installing this kit. Every axle varies slightly and some fabrication may be required.
*RM6005 is for Passenger Drop KingPin Dodge 60.
Reviews
Install Instructions
THIS KIT INVOLVES EXTENSIVE WELDING AND GENERAL
FABRICATION SKILLS. ONLY COMPETENT WELDERS SHOULD ATTEMPT TO INSTALL THIS KIT.
Tools Required :
Safety Glasses, Gloves, , Socket Set,
Wrenches, Wheel chocks, Jack, Jack stand. Cutting Tool of your
choice (Sawzall, Grinder, plasma, cutting torch) Welder.
Step 1:
Inventory that you have all of the parts for
your order If you are missing parts
or have incorrect parts contact Artec Industries Immediately @
(855)-278-3299 M-F from 8am-5pm MST If it is after
those hours please Email Sales@Artecindustries.com
Step 2:
Place wheel chocks at the rear wheels of the
vehicle. Break free lug nuts on front wheels (Do not fully loosen or remove lug nuts yet.)
Step 3:
Jack up the front of the vehicle and set the
axle on Jack stands, Remove the front wheels from the vehicle, With
the wheels removed Jack the vehicle up again. Securely place tall
jack stands under the frame behind the LCA or Leaf spring mounts at
the previously measurement of ride height. Place a 2nd sent of jack stands
under the front axle.
Step 4:
Prep axle To weld the Ram mount into place. Once
the axle is prepped.
Step 5:
You will want to
mock fitment of the ram mount against the axle ,Mount your steering ram to the mounting blocks centering the ram
as much as possible on the ram mount. (You
may only be able to run 2 or 3 of the mounts to center the ram.) With
the ram at full lock and knuckle in full lock you will want to Tack weld the Ram
Mount and Ram mounting blocks into position so the Ram's shaft and tie rod are
inline (If they are not inline it could cause stress to the shaft and damage the ram You will also want to
protect the ram’s shaft from weld splatter this could damage the ram ) With the ram mount tacked into place ,Pull the
axle from under the vehicle to allow more space for
welding. Once the axle is pulled from under the vehicle.
Remove the Ram from the ram mount. Heat the axle to about 400 degrees
Start to weld the gussets to the axle and ram mount .When welding,
Start on one side of the axle, Weld a small amount, Then move on to the
opposite side of the axle to allow each side to cool. This will help prevent
warping .Stitch welding is preferred and welding every inch of every
seam is not necessary. Grind and clean the rosette welds on the axle. (Optional) Stitch weld the axle tubes to the
ends of the casting for added axle strength and to prevent the axle tubes from
twisting. Once all of the
welding is complete you will wrap the axle in a welding blanket to
slowly cool overnight.
Step 6:
Clean the Ram mount and axle of any machining
oils and Prep for paint or powder coat.
Step 7:
Install the axle back under the vehicle, and place on jack stands. And install your ram
Install the wheels on the vehicle and
tighten the lug nuts (Do
not torque them down yet.) Lift the vehicle and remove all of the jack stands and set the
vehicle on the ground. with the vehicle on the ground check all of
the bolts and lug nuts are torqued to proper specs. we recommend drawing a line
on the nut and bolt heads and where they are mounted for quick reference when
checking for tightness after 50 miles .


Community Discussion


